
Selecting and editing
Most editing happens with the Select (S) tool and the right-click menu, whose commands are also in the Edit menu in the top toolbar. This topic covers picking objects, moving and transforming them, the keyboard shortcuts that act on a selection, the snapping that affects where things land, and the operations that build new geometry from what you have selected: Boolean operations, Simplify, Weed box, Array, Offset, Warp and dash patterns.
Selecting objects
- Click an object to select it. Clicking a member of a group selects the whole group.
- Shift-click an unselected object to add it to the selection. Shift-click a selected object to remove it.
- Drag on empty space to draw a marquee. By default it selects only objects it fully encloses, and the box is drawn solid with the label Enclosed. Hold Shift to select everything the box touches instead; the box turns dashed and reads Touching. Hold Alt/Option (⌥) to add the box's objects to the current selection rather than replacing it; the label gains + add. Either key can be pressed or released part-way through the drag.
- Cmd/Ctrl+A selects every object on the artboard. Hidden and locked objects are left out. With the Edit nodes tool active it selects that object's nodes instead.
- Escape, or a click on empty space, clears the selection.
- In the Objects panel, Shift-click rows to pick several objects out of the list.
A marquee skips objects on a hidden layer, and individually hidden objects, since there is nothing on screen to aim at.
Moving with the mouse
Drag a selected object to move it, along with everything else that is selected.
- Hold Shift to lock the drag to whichever axis has travelled furthest, so the object stays exactly level or plumb.
- Hold Alt/Option (⌥) when you press to grab a copy instead: the original stays put and the duplicate is what you carry away. Shift still works alongside, so a copy can be dropped straight down or straight across.
- Alt/Option (⌥)-click without dragging leaves a copy exactly on top of the original, with the copy selected.
- With Snap to grid on, the drag moves in whole grid cells. With Snap to scaffolding lines on, the selection's edges and center align to a guide when they come within a few pixels of it.
Dragging a whole object does not snap its loose ends to another path's ends. To close a gap exactly, drag the individual node with the Edit nodes tool, or draw a line between the ends with the Pen.
Scaling and rotating with handles
A selection shows a box with eight handles. Hover a handle to see its cursor.
- Top-right handle (the round one) rotates the selection about its center. Hold Shift to turn in 15° steps, the same stops the node editor and the Pen use.
- The other three corner handles resize. They keep the selection's proportions by default. Hold Ctrl to resize freely and distort the shape. Holding Shift asks for proportions again, so Shift and Ctrl together keep them.
- Edge handles stretch one axis freely with no modifier.
Both modifiers are read live, so you can take a constraint up or let it go part-way through a drag. For exact sizes, use the Dimensions fields in the Inspector.
Nudging with the arrow keys
The arrow keys move the selection by a fixed step: 1/16 in when the document unit is inches, or 1 mm when it is millimeters. Hold Shift for the finer step, 1/64 in or 0.1 mm. The step is independent of the grid, so a nudge is always the same distance whatever the snap settings are. With the Edit nodes tool active and nodes selected, the arrows move the nodes instead; with no nodes selected they move the whole object.
Copy, paste and duplicate
- Cmd/Ctrl+C copies the selected objects to the app's own clipboard.
- Cmd/Ctrl+V pastes fresh copies and selects them. Each paste in a row lands a little further down and to the right of the last, so repeated pastes do not stack invisibly.
- To duplicate in place, Alt/Option (⌥)-click an object, or Alt/Option (⌥)-drag it to put the copy somewhere else.
- Mirror horizontal and Mirror vertical in the Edit or right-click menu make a reflected copy laid flush against the original (across its right edge or its bottom edge). The copies become the selection.
- For many copies in a pattern, use Array.
There is no Cut shortcut; copy, then press Delete.
Delete
Press Delete or Backspace to remove every selected object. With the Edit nodes tool active and nodes selected, the same keys remove the nodes instead; with the Stroke Profile tool they remove the selected width stop.
Undo and redo
- Cmd/Ctrl+Z undoes. Cmd/Ctrl+Shift+Z or Cmd/Ctrl+Y redoes. The toolbar's Undo and Redo buttons do the same.
- Every committed edit is one step. Live adjustments such as dragging a slider or scrubbing a radius record a single step when you let go, not one per nudge.
- Panning, zooming and orbiting change only the view and are never undo steps.
- Scaffolding guides live outside the undo history. Undoing Convert lines to guides brings the lines back but leaves the guides; remove those from the Guides menu or by right-clicking one.
History is limited by how much memory it uses rather than by a fixed number of steps. Ordinary documents keep a deep history; a document carrying a large embedded image trades some depth to stay stable.
Shortcut summary
- Cmd/Ctrl+A: select all (or all nodes in the Edit nodes tool).
- Escape: deselect.
- Shift-click: add to or remove from the selection.
- Arrow keys: nudge; Shift for the finer step.
- Cmd/Ctrl+C and Cmd/Ctrl+V: copy and paste.
- Alt/Option (⌥)-drag: drag a copy. Alt/Option (⌥)-click: copy in place.
- Delete or Backspace: remove the selection.
- Cmd/Ctrl+Z: undo. Cmd/Ctrl+Shift+Z or Cmd/Ctrl+Y: redo.
- A: open Array for the selection. J: open Join.
- Space-drag or middle-button drag: pan without changing tools.
- Cmd/Ctrl+P: print.
The Edit menu and the right-click menu
The same set of commands is in two places. Right-click an object to open the canvas menu: if the object was not already selected, it (or its whole group) becomes the selection first, and most entries act on everything selected. Entries that do not apply to the object are left out. Edit in the top toolbar lists every one of these commands for the current selection; there, an entry that does not apply is greyed out rather than left out, so the full list is always on view. With nothing selected, only Guides → Delete all guides is available.
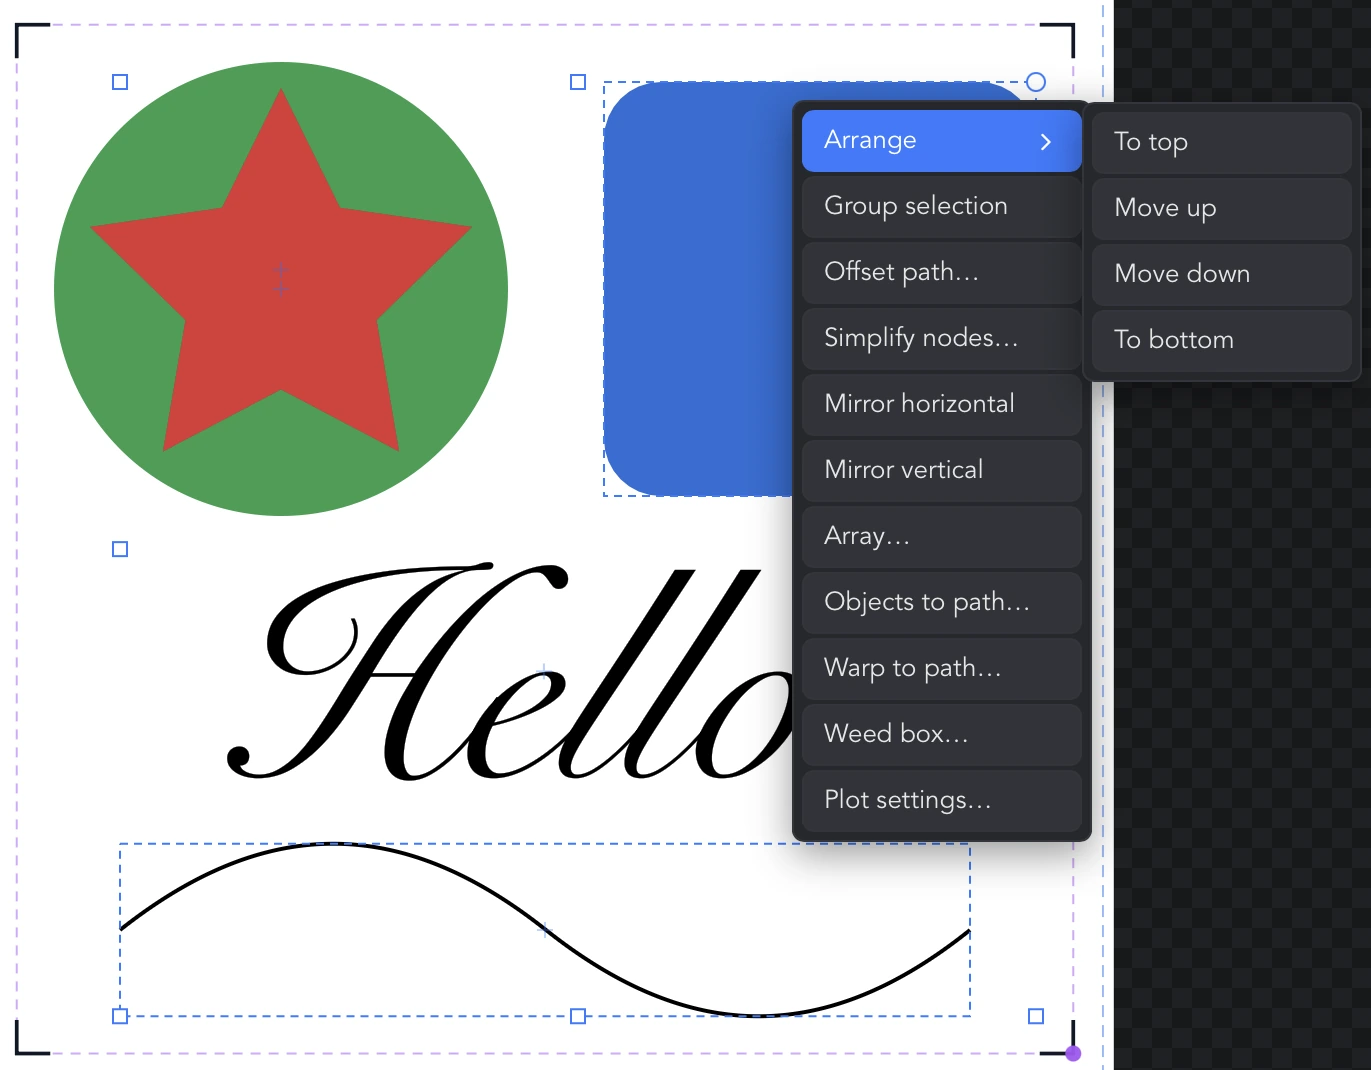
- Arrange: a submenu with To top, Move up, Move down and To bottom. Loose objects reorder among the top-level items, so they can rise above or drop below groups; objects inside a group reorder within it.
- Group selection: shown with two or more objects selected. Groups move, select and arrange as one.
- Ungroup: shown when the object is in a group. Dissolves that group.
- Offset path…: opens the Offset path panel (see below).
- Expand stroke to paths: shown when the object has a stroke. Converts the stroke, uniform or variable-width, into a filled path that cuts as an outline, replacing each selected object in place.
- Break apart: shown when the object is a compound path, such as text converted to paths or a multi-shape trace. Splits it into one object per contour.
- Crop image to shape: shown when exactly one image and one shape are selected. Crops the picture to the shape's outline; the shape is consumed.
- Release crop: shown on a cropped image. Splits it back into the picture and the shape, both exactly where they were, and selects both.
- Simplify nodes…: opens the Simplify nodes dialog (see below).
- Guides: a submenu with Convert lines to guides (shown when the selection holds a straight two-point line; it becomes an infinite guide and the line is removed) and Delete all guides.
- Mirror horizontal and Mirror vertical: reflected copies, as described under copy and paste.
- Array… and Objects to path…: open the Array panel, the second on its along-a-path pattern.
- Warp to path…: opens the Warp to path panel and arms the path pick straight away.
- Weed box…: opens the Weed box dialog.
- Plot settings…: per-object cutting settings for everything selected.
- Edit text and Convert to paths: shown on text objects. See the Text and fonts topic.
Right-click a scaffolding guide to get Delete this guide and Delete all guides.
Group and ungroup
Select two or more objects, right-click and choose Group selection. From then on, clicking any member selects the group, a marquee that catches a member takes the whole group, and Arrange moves the group as one. Right-click a member and choose Ungroup to dissolve it. Groups also appear as collapsible rows in the Objects panel, where they can be hidden or locked together.
Align
With two or more objects selected, the Inspector shows an Align row: Align left, Align center, Align right, Align top, Align middle, Align bottom, and, set apart, Center on both axes, which centers the objects horizontally and vertically in one click.
Lock and hide
Each row in the Objects panel has an eye and a padlock. The eye (Hide / Show) takes an object off the canvas; the padlock (Lock / Unlock) keeps it on screen but out of reach of clicks, marquees, nudges and Delete. Group rows carry the same two controls for all of their members. Hidden and locked objects are skipped by Cmd/Ctrl+A. Note that fading an object to 0% opacity is not the same as hiding it: it is still selectable and still cut.
Grid, scaffolding lines and snapping
The second row of the top toolbar holds the view and snapping toggles.
- Toggle grid shows or hides the grid. The Grid style button switches between lines and dots, and the Smaller grid increments and Larger grid increments buttons halve or double the spacing shown in the readout beside them. The unit button toggles the document between mm and in.
- Snap to grid snaps points you place and moves you make to the grid.
- Snap to scaffolding lines snaps to guides. Drag down from the top ruler for a horizontal line, or right from the left ruler for a vertical one. For an angled guide, draw a line and use Guides → Convert lines to guides.
- Show object centers and snap to them draws a crosshair at every object's center and lets points you place land on one. It is on by default for a new document.
- The red dots marking the loose ends of open paths are snap targets whether or not any of the toggles above are on. The toggle beside the fills button hides the dots on a busy drawing; they still snap.
Snapping applies in this order for a placed point: a loose end wins, then an object center, then a guide, then the grid. Grid and guide settings are saved with the document.
Boolean operations
Hover the Boolean button on the tool rail to open its row. Select the objects first; the result is selected afterwards.
- Union welds the selected objects into one. With a single object selected it welds that object's own overlapping outlines, which is how to merge overlapping letters in a word without breaking the text apart first. Nothing overlapping means nothing is changed.
- Intersect keeps only the area common to all the selected objects.
- Difference removes the shapes on top from the one underneath, in stacking order rather than the order you clicked.
- Exclude keeps the areas that do not overlap and drops the ones that do.
- Knockout opens the Knockout dialog, below.
Intersect, Difference, Exclude and Knockout need at least two objects.
Knockout
Knockout, in the Boolean fly-out, fits stacked shapes together into one flat piece for layered vinyl: each object is cut out of the ones beneath it and trimmed back to them, so nothing hangs off the edge and the finished outline is the shape underneath.
- Gap: the hole is cut this much larger than the piece that fills it, so two colors never touch when they are weeded and laid up. Zero cuts them flush. It starts at 0.05 in or 1 mm.
- Anything left with nothing is removed.
- Click Knock out to apply, or Cancel.
Simplify nodes
Right-click and choose Simplify nodes… to reduce a path's node count while keeping its shape within a tolerance. Fewer nodes cut and plot more smoothly.
- Tolerance: how far the simplified path may drift from the original. Larger values remove more nodes.
- Smooth curves (keeps sharp corners sharp): re-fits smooth curves through the remaining nodes while leaving true corners as corners.
- The dialog shows the node count before and after, and the canvas previews the result as you type. Press Enter or click Simplify to keep it; Cancel puts the original back.
A warp, round-corner or stroke profile on the object is dropped when it is simplified.
Weed box
A weed box is a rectangular cut border around the design, so the excess vinyl inside it lifts away in one piece. Click Weed box in the toolbar or choose Weed box… from the right-click menu.
- The box wraps the selection, or everything on the artboard when nothing is selected.
- Offset: the gap between the artwork and the border. It starts at 0.25 in or 6 mm.
- Corner radius: rounds the border's corners.
- Separate box around each object: shown with several objects selected. Draws one box per object instead of one around all of them.
- The dialog shows the border's size and warns if it would run past the artboard. Click Add weed box to create it. The box is stroke-only, so it never hides the artwork, and cuts like any other object.
Array
Select the objects to repeat, then press A, click Array in the toolbar, or right-click and choose Array…. The floating Array panel builds the copies live on the canvas as you adjust it; drag it clear by its title bar.
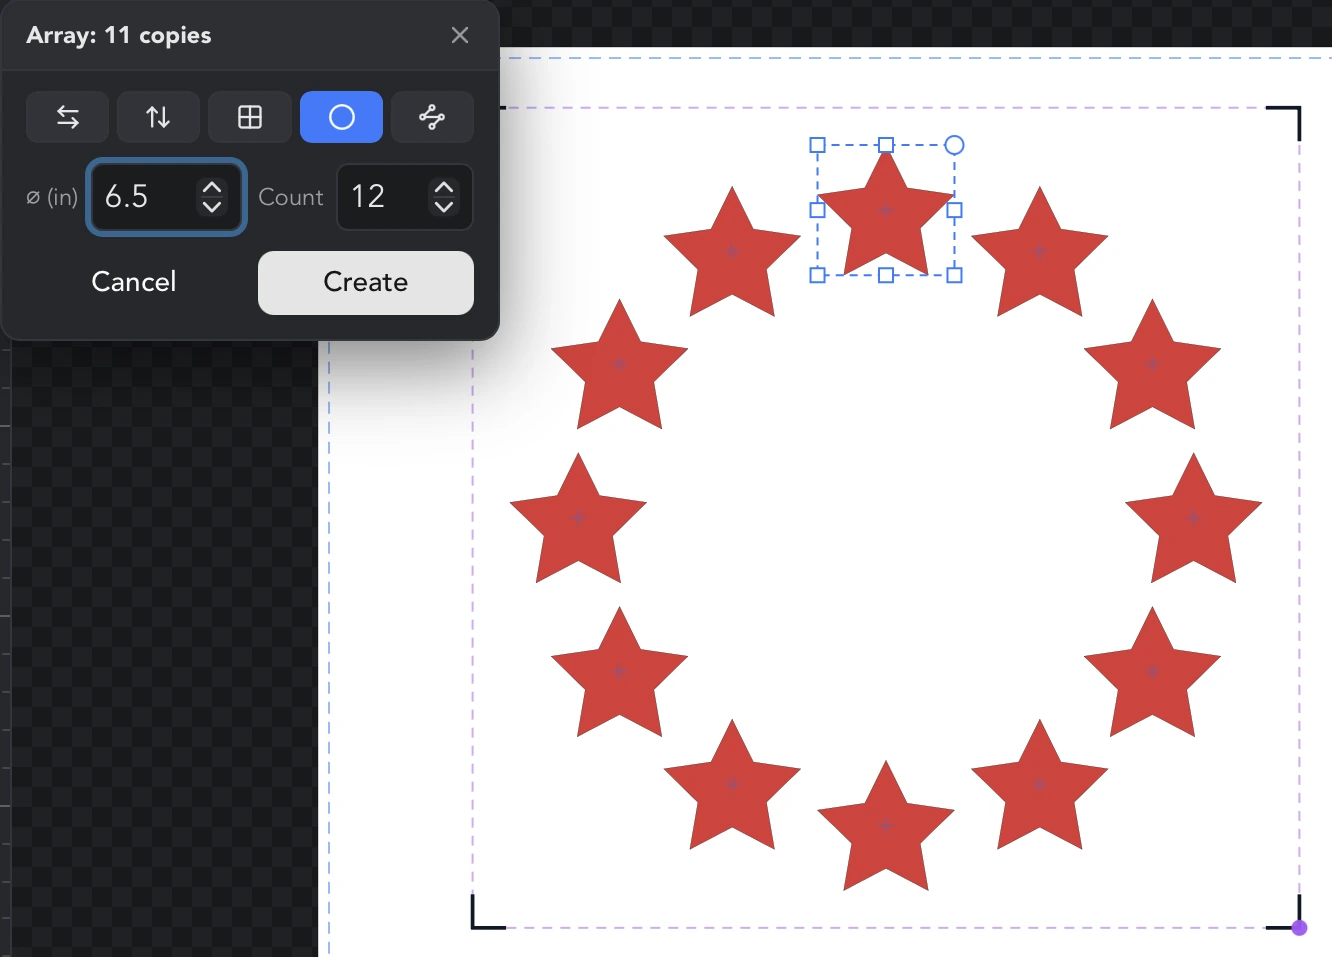
- Pick a pattern: Horizontal row, Vertical column, Grid, Circular ring or Along a path.
- Rows and columns take Rows and Cols (grid) or a Count, plus a Gap in the current unit. A negative gap overlaps the copies, and the panel says by how much; a gap that would stack every copy on the same spot is refused.
- Circular ring takes a diameter (⌀) and a Count.
- Along a path takes a Count and a Gap. Click Pick a path, then click an object on the canvas to use its outline, which must not be part of the selection. Follow the path turns each copy to the curve's direction. If the path is too short for the count, the panel says how many fit; close it, lengthen it, or reduce the gap for the rest. Right-click Objects to path… opens the panel on this pattern directly.
- Arrays are capped at 1000 copies.
- Click Create to keep the copies, which are selected along with the originals, or Cancel to remove them.
Offset path
Right-click an object and choose Offset path… to make a new outline a fixed distance outside or inside it: a cut line around a sticker, or the backing layer for layered vinyl. The floating Offset path panel previews the result as you type.
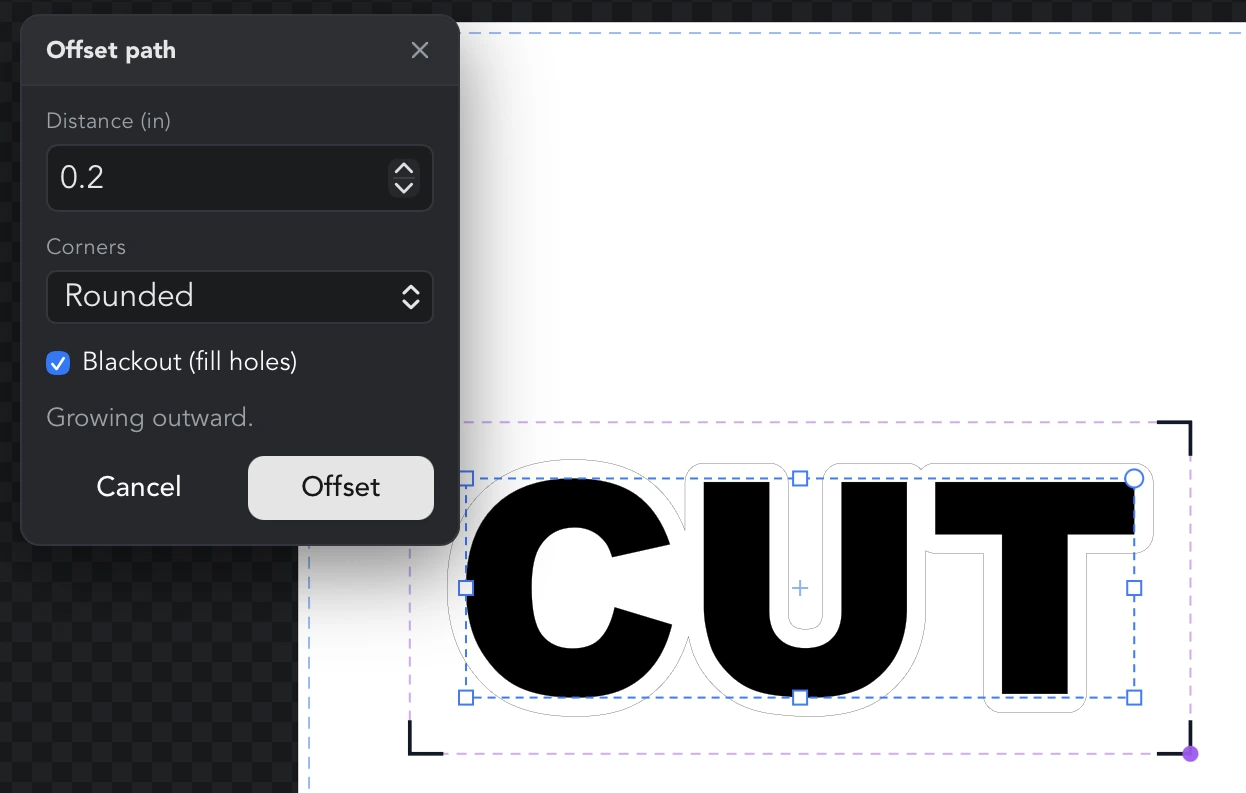
- Distance in the current unit. A positive value grows outward; a negative one shrinks inward. The panel says which. An inward offset that collapses the shape is reported rather than applied.
- Corners: Sharp (miter), Rounded or Beveled. Sharp corners are limited so a narrow angle cannot grow a long spike, which would be a weeding hazard.
- Blackout (fill holes): fills in counters and any other holes so the offset comes back as one solid shape.
- Press Enter or click Offset to keep the new path, which is selected; Cancel removes the preview and leaves the document as it was.
Silhouette
Select the objects, right-click and choose Silhouette… to weld their outlines into one filled shape: the backing layer under a multi-color design, a contrasting shape behind a cluster of lettering, or the start of a cut line around a sticker. The silhouette is added as a single new object, and the originals are left as they are unless you say otherwise.
- Everything the objects paint counts. A stroked outline or an open stroked line contributes the band of ink its stroke draws, so a thick or outside-aligned stroke makes the silhouette that much bigger. Fills and closed outlines contribute the area they enclose, whether or not they are filled. Images contribute their clip shape, or their frame when they are not cropped.
- Overlaps are welded away. Gaps enclosed by the artwork stay as holes unless you turn on blackout, below.
- Keep original objects, on by default, leaves the originals exactly where they are and places the silhouette directly beneath them in the stacking order, in the same layer or group. Turn it off to remove the originals and put the silhouette in their place.
- Blackout (fill holes): fills in counters and any other gap the artwork encloses, so the silhouette comes back as one solid shape, the backing layer under layered vinyl. The outline is the same either way; only the interior changes.
- The silhouette is filled with the current fill color, has no stroke, and is named Silhouette in the Objects panel. It is selected afterwards, and one undo removes it and brings back anything that was replaced.
- Click Apply to create it, or Cancel. Selecting only open paths with no stroke is reported in the dialog, since there is nothing to enclose.
Warp to path
Right-click an object and choose Warp to path… to bend its geometry around a curve. This deforms one object; to place untouched copies along a curve use Array's along-a-path pattern instead.
- The pick is armed as soon as the panel opens: click the path on the canvas to bend around. You cannot pick the object being warped. Click Pick a path to choose a different one later.
- Amount: a slider from 0% (unchanged) to 100% (fully bent).
- Stretch to fit the path: scales the object to span the whole path. With it off, a Position menu places the object at the path's Start, Middle or End.
- Reverse the path runs the object the other way along it; Flip across the path mirrors it to the other side.
- Every control is absolute: any combination describes one bend of the original artwork, so turning the amount back to 0 restores the object exactly.
- The panel shows the resulting node count, because a warp has no exact curve to land on and resamples the outline. Click Apply to keep it or Cancel to put the object back.
Dash patterns
A stroke's dash pattern is set from the Inspector's stroke section: the Dash row shows the current pattern and its Edit… button opens the Dash pattern dialog. Steps alternate between dash and gap and the whole sequence repeats along the line; the canvas previews it as you build it.
- Start from a preset: Solid, Dashed, Dotted, Dash-dot, Long dash or Short-long.
- Each step is a field in the current unit, labeled Dash 1, Gap 1, Dash 2 and so on. Click Add step to append one, the Remove this step button beside a step to remove it, or Clear to go back to a solid line.
- An odd number of steps repeats to an even one, so a single step reads as equal dashes and gaps.
- Press Enter or click Apply to keep the pattern; Cancel restores the original.