
Preferences, updates and your account
LineaForge keeps a small set of app-wide settings in the Preferences dialog, checks for new versions through the Help menu, and ties each install to your purchase through the Account dialog. This page covers all three, plus the Help entries that bring you to this guide, to the guided tour and to the contact form.
Opening Preferences
Click Preferences at the right-hand end of the top bar (the gear icon, next to Help and Account). The dialog is titled Preferences and describes itself as "Settings for this copy of LineaForge": everything in it is stored on this computer, not in your documents, so it does not travel with a saved file and does not affect anyone you share a file with.
Every change applies immediately. There is no Save or Apply button; close the dialog when you are done.
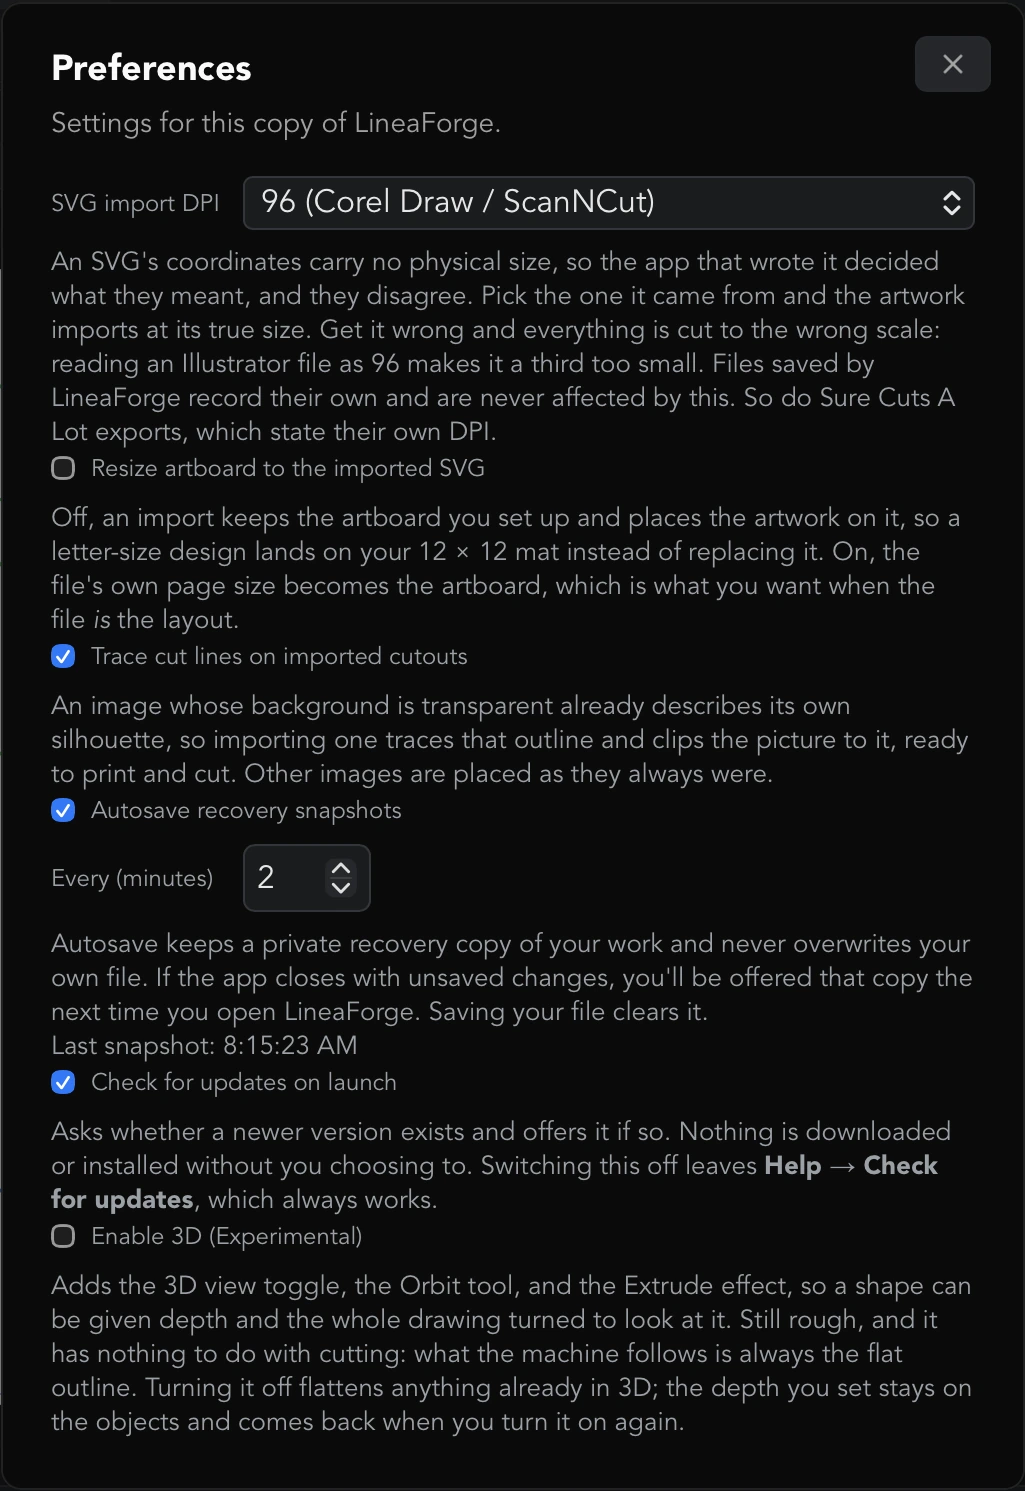
SVG import DPI
An SVG's coordinates carry no physical size, so the program that wrote the file decided what one unit meant, and different programs disagree. Pick the program your SVG files come from and they import at their true size:
- 72 (Adobe Illustrator)
- 90 (Inkscape) for files from Inkscape 0.91 and earlier
- 96 (Corel Draw / ScanNCut): the default, and also what Inkscape 0.92 and later write
- 100
- 300 (Corel Draw) when CorelDRAW has been set to export at 300
Getting this wrong is why an imported design arrives at the wrong size: reading an Illustrator file as 96 makes it a third too small. Files saved by LineaForge record their own DPI and are never affected by this setting, and Sure Cuts A Lot exports state their own DPI too.
One known limit: an SVG that states its size in inches or millimeters rather than pixels is still read as pixels, so the DPI setting applies where it should not. If an import arrives at an odd size and changing the DPI does not fix it, that is the likely reason.
Resize artboard to the imported SVG
Off by default. With it off, an import keeps the artboard you set up and places the artwork on it, so a letter-size design lands on your 12 × 12 mat instead of replacing it. Switch it on when the file's own page size should become the artboard, which is what you want when the file is the layout itself.
Trace cut lines on imported cutouts
On by default. An image with a transparent background (PNG, WebP or GIF) already describes its own silhouette, so importing one traces that outline and clips the picture to it, ready for print and cut. Images without transparency (JPEG, BMP, or a PNG with a solid background) are placed as plain pictures either way. Switch this off if you would rather every image arrive untraced and trace it yourself later with Vectorize.
Autosave recovery snapshots
On by default. Autosave keeps a private recovery copy of every document with unsaved changes and never overwrites your own file. If the app closes with unsaved changes, whether from a crash or a plain quit, you are offered that copy the next time you open LineaForge. Saving a file clears its snapshot, and so does choosing Don't save when closing.
- Every (minutes) sets how often a snapshot is taken. The default is 2; the range is 1 to 60. The field is disabled while autosave is off.
- The line under the setting shows Last snapshot with the time, or "No snapshot taken yet this session."
Snapshots are only taken of documents that have something drawn in them, so toggling the grid in an empty document does not create one. See "I lost work after a crash" in Troubleshooting for how recovery works at launch.
Check for updates on launch
On by default. When switched on, LineaForge asks the update server once per launch whether a newer version exists and, only if one does, opens the update dialog. Nothing is downloaded or installed without you choosing to. Switching this off leaves Help → Check for updates…, which always works. See "Checking for updates" below for what the launch check does and does not tell you.
Show the guided tour on launch
On for a fresh install. When ticked, the guided tour starts the next time a document is opened after launch: a series of bubbles pointing at each part of the window and every tool on the rail. Finishing or skipping the tour clears the box, so it shows itself once and then only when asked for. Tick it again to be offered the tour at the next launch, or click Start the tour to run it straight away; the dialog closes so the bubbles can point at the toolbar behind it. Help → Guided tour… starts it too, at any time, without changing this setting. See "The guided tour" in Getting started.
Enable 3D (Experimental)
Off by default. Switching it on adds the 3D view toggle at the right of the lower toolbar, the Orbit tool on the tool rail (shortcut V), and the Extrude effect in the Inspector, so a shape can be given depth and the whole drawing turned to look at it.
It is still rough, and it has nothing to do with cutting: what the machine follows is always the flat outline, whatever the screen shows. Turning it off flattens anything already in 3D and removes those controls; the depth you set stays on the objects and comes back when you turn it on again.
Settings that live somewhere other than Preferences
Preferences holds only the settings that belong to this copy of the app. If you are looking for something else:
- Measurement unit and printable margins belong to the document. Open File → Document… (the dialog is titled Document settings). Print & cut and its registration marks belong to the document too, but are set where the job is: Plot, then the Output tab. All of these are saved in the
.lffile, so a print-and-cut sheet opens already set up, and a new document starts from the ones you last used. - Cutter settings (force, speed, blade offset, transport, Wi-Fi address and so on) belong to the machine. Open Plot, then Manage machines… to add, pick or tune one. Each machine keeps its own settings.
- The printer is chosen in the Print dialog and is remembered app-wide: it is the hardware in the room, not something a file should carry.
- Grid, snapping, units toggle and the fills and loose-end toggles are the icon buttons on the lower toolbar.
If the Preferences dialog itself is cut off at the top or bottom of the screen, see "The bottom of a dialog is cut off" in Troubleshooting.
Preference defaults at a glance
What a fresh install starts with, for when you want to put something back:
- SVG import DPI: 96 (Corel Draw / ScanNCut)
- Resize artboard to the imported SVG: off
- Trace cut lines on imported cutouts: on
- Autosave recovery snapshots: on, Every (minutes) 2
- Check for updates on launch: on
- Show the guided tour on launch: on, until the tour has been finished or skipped once
- Enable 3D (Experimental): off
Checking for updates
Open Help in the top bar and choose Check for updates…. The dialog opens with "Checking for updates…" and then tells you one of three things:
- LineaForge 0.9.2 is the latest version. (with whatever version you have). Press Check again to ask once more, or Close.
- LineaForge X.Y.Z is available, with the release notes and a line saying which version you have now. Press Update now to download and install it, or Later to leave it until next time.
- An error, in red, when the check itself failed: for example when you are offline or the update server could not be reached. The manual check always reports a failure rather than staying silent, because a check that silently does nothing looks exactly like a broken one.
The check contacts the LineaForge update server at rabidsample.com. It identifies this install with your activation PIN and device ID so the server can answer per license; nothing else about your computer or your documents is sent. It waits at most eight seconds for an answer.
The launch-time update check
With Check for updates on launch switched on in Preferences, LineaForge also checks once each time it starts. This check is deliberately quiet:
- It runs only after you have left the start screen by creating, opening or restoring a document, so it never interrupts you at the document picker. If you leave the app sitting on the start screen, you will not be offered an update that session; you get it on the next launch, or from Help → Check for updates….
- It opens the update dialog only when a newer version actually exists.
- A failed check says nothing at all. Being offline is not worth interrupting your work over, and the app works perfectly well without an update.
How an update installs
Press Update now and the dialog shows a progress bar with "Downloading X of Y…" (or "Starting download…" before the first bytes arrive). While the download and install are running the dialog cannot be closed, and it says so: "The app will restart on its own when this finishes. Don't quit." Every download is signature-checked before anything is installed; a file that does not match the LineaForge signing key is refused.
- On macOS, the new version replaces the application in place and LineaForge relaunches itself. Your documents, preferences and activation are untouched.
- On Windows, the installer runs in passive mode: a progress window appears, there are no questions to answer, and LineaForge relaunches when it has finished.
If the install fails, the error is shown in the dialog and the version you were running keeps working. If the release was withdrawn between the dialog opening and you pressing the button, the dialog simply reports that you are up to date.
Help → About
Help → About opens a dialog titled About LineaForge followed by the version number, for example About LineaForge 0.9.2. This is the number to quote in any bug report: it comes from the installed build itself, so it cannot disagree with what you are running. Under it, "Published by RS Web Services" and three tabs you can read without leaving the app:
- License (EULA): the end-user license agreement for the software.
- Privacy Policy: what information the app and the activation service collect, how it is used and kept, and the third-party services involved.
- Terms of Service: the terms covering your purchase and use.
The Account dialog
Click Account at the right-hand end of the top bar (the person icon). The dialog shows the registration details for this copy, read from the license stored on this computer:
- Name and Email you registered with. Email has a copy button.
- Activation PIN: the PIN from your purchase, with a copy button.
- Status: the license status the activation server reported.
- Activated: the date and time this computer was activated.
- Device ID: the identifier this computer was registered under, with a copy button. Support may ask for it.
If the dialog says "This copy is not activated yet.", the app has no license on this computer; the activation screen appears on the next launch.
A license covers two devices. Activating a third computer is refused by the server until a slot is freed, which is what the button at the bottom of this dialog is for.
Moving LineaForge to a new computer
There is no per-device sign-out. To move to a new machine when both slots are taken:
- On any computer that is still activated, open Account and press Deactivate all installs.
- Read the warning: "Every machine using this PIN will be signed out and must re-activate, including this one. Requires an internet connection." Press Deactivate everything to go ahead, or Cancel.
- LineaForge reloads to the activation screen. Both slots are now free.
- On the new computer, enter your name, email and PIN on the activation screen and press ACTIVATE. Re-activate the old computer the same way if you still want to use it there.
If the server cannot be reached you will see "Could not reach the activation server. Connect to the internet and try again." and nothing changes. If you no longer have access to any activated computer, use Help → Contact & feedback… and include your PIN and the email you registered with.
What needs an internet connection
- Activation and Deactivate all installs always need a connection. If the activation server cannot be reached, the activation screen says "Could not reach the activation server. Check your internet connection."
- Day-to-day use does not. Once activated, LineaForge trusts the license stored on this computer and starts without a connection. When a connection is available it quietly re-confirms the license in the background and gives up after a few seconds if the server does not answer; only a definite "no longer valid" answer from the server will lock the app.
- The license is bound to this computer's device ID. Copying LineaForge's data folder to another machine does not carry the activation with it; activate there instead.
- Update checks, Google Fonts downloads and the Contact & feedback form need a connection. Everything else, including cutting over USB, serial or your local Wi-Fi, works offline.
Help → User guide…
Help → User guide… opens this guide inside the app. Type in the search box at the top ("Search the guide (e.g. weld, registration marks, USB)") to find any topic: results are the individual sections of each page, so searching "DPI", "deactivate" or "cut off" takes you straight to the paragraph that answers it. Clear the search to browse the pages in order from the list on the left. Links inside the guide, such as Troubleshooting or Keyboard shortcuts, jump to that page.
Help → Guided tour…
Help → Guided tour… runs the guided tour from the top: the bubbles that walk the window and the tools, as shown on first launch. Use Next, Back and Skip tour, or the arrow keys and Escape. Running it from here does not change the Show the guided tour on launch preference. See "The guided tour" in Getting started.
Help → Contact & feedback…
Help → Contact & feedback… opens a form, titled Contact & feedback, for asking a question, reporting a bug, or requesting a feature. It is emailed to the LineaForge team, who reply to the address you give. The form asks for:
- What is this about?: Question ("How do I…? Why does…? Anything about using the app."), Bug report ("Something went wrong. Say what you did, what you expected, and what happened instead.") or Feature request ("Something the app should do, and what you would use it for.").
- Your name and Your email, filled in from your activation details the first time; you can change them.
- Subject (optional) and Message. For a bug report the message box prompts: "What did you do, what did you expect, and what happened instead? Paste any error text exactly as shown."
Press Send. Every message is sent with your app version and platform (macOS or Windows), so we can reproduce what you describe, and your activation details, so we know which license to look at; you do not need to look any of that up. You see Message sent when it has gone, or "The message could not be sent. Please try again." if the connection failed. For cutter problems it also helps to paste the output of USB diagnostics…, under the USB transport in the Plotter dialog. See "Still stuck?" at the end of Troubleshooting for the full checklist.