
Getting started
LineaForge is a vector-design app for vinyl cutters and pen plotters. You draw or import a design, set up the page it will be cut from, and send it to the machine. This topic covers the first launch, what each part of the window does, how to move around the canvas, and a short walkthrough from a blank page to a cut job.
Activating LineaForge on first launch
The first time LineaForge opens it shows an activation screen instead of the editor. You need the activation PIN from your purchase.
- Enter your name in NAME.
- Enter your email address in EMAIL.
- Enter the PIN in ACTIVATION PIN. It is typed in the form
XXXX-XXXX-XXXXand is converted to capitals as you type. - Click ACTIVATE.
Activation needs an internet connection: LineaForge contacts rabidsample.com to bind this computer to your PIN. One PIN can be active on up to 2 devices at a time. If the server refuses the PIN (for example because both device slots are already used), the reason is shown in red above the form and you can try again.
Once activated, the license is cached on this computer. Later launches do not need the internet: LineaForge trusts the cached activation when it is offline and quietly re-checks it with the server when a connection is available. The cached license only unlocks the computer it was activated on; copying it to another machine does not work.
Your account and moving to another computer
Click Account at the right end of the top toolbar to see the details LineaForge has on file for this copy: Name, Email, Activation PIN, Status, Activated (the date and time) and Device ID. The email, PIN and device ID each have a copy button beside them.
To move LineaForge to a new computer when both device slots are taken:
- Open Account and click Deactivate all installs.
- Read the warning, then click Deactivate everything. (Click Cancel to back out.)
- Activate again on each computer you still want to use.
This signs out every machine using the PIN, including the one you are on, and frees both device slots. It requires an internet connection.
The Start screen
After activation, and on every later launch, LineaForge opens on the Start screen so you can pick a page before you draw. You have three choices:
- Click a preset: 12 × 12 in (a square cutter mat) or Letter (8.5 × 11 in).
- Set a Custom size: choose the Unit (inches or millimeters), type W and H, and click Create. Both numbers must be greater than zero.
- Click Open… under "Already have a file?" to open a saved LineaForge project (
.lf) or import an SVG.
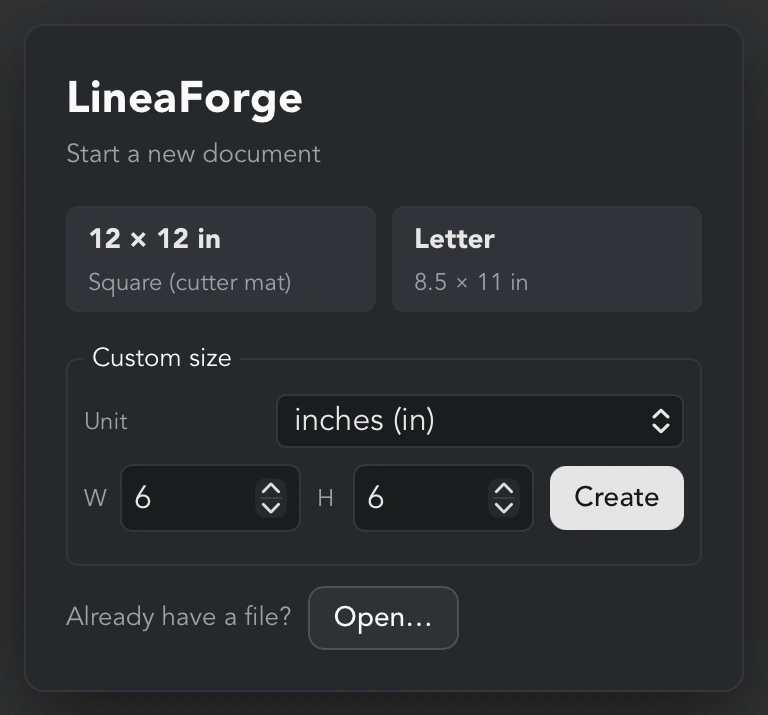
Opening a .lf file makes it the current document. Opening an SVG imports it as new, untitled work; see Documents and files for how SVG imports are scaled.
If LineaForge finds unsaved work from a previous session, the Recover unsaved work? prompt appears before the Start screen. See Documents and files for details.
The guided tour
The first time a document is opened after installing, a guided tour starts: a series of bubbles, each pointing at one part of the window and saying what it is and how it works. It walks the top toolbar, every tool on the rail one by one, the document colors, the canvas and its tabs, and the Inspector and Objects panels, in about forty short steps.
- Click Next and Back, or press the right and left arrow keys, to move between bubbles. Enter also moves forward.
- Click Skip tour, the × in a bubble, or press Escape to leave at any point.
- Finishing or skipping the tour stops it from showing itself again.
To go through it again, choose Help → Guided tour…. To have it offered at the next launch instead, tick Show the guided tour on launch in Preferences; see Preferences, updates and your account.
While a bubble is showing, the rest of the window does not take clicks: the tour describes the tools rather than waiting for you to try them. Everything it says is covered in more depth in this guide.
A tour of the interface
The window is laid out in five parts: a two-row toolbar across the top, a tool rail down the left, the canvas in the middle with a tab strip above it and artboard tabs below it, and a sidebar on the right.
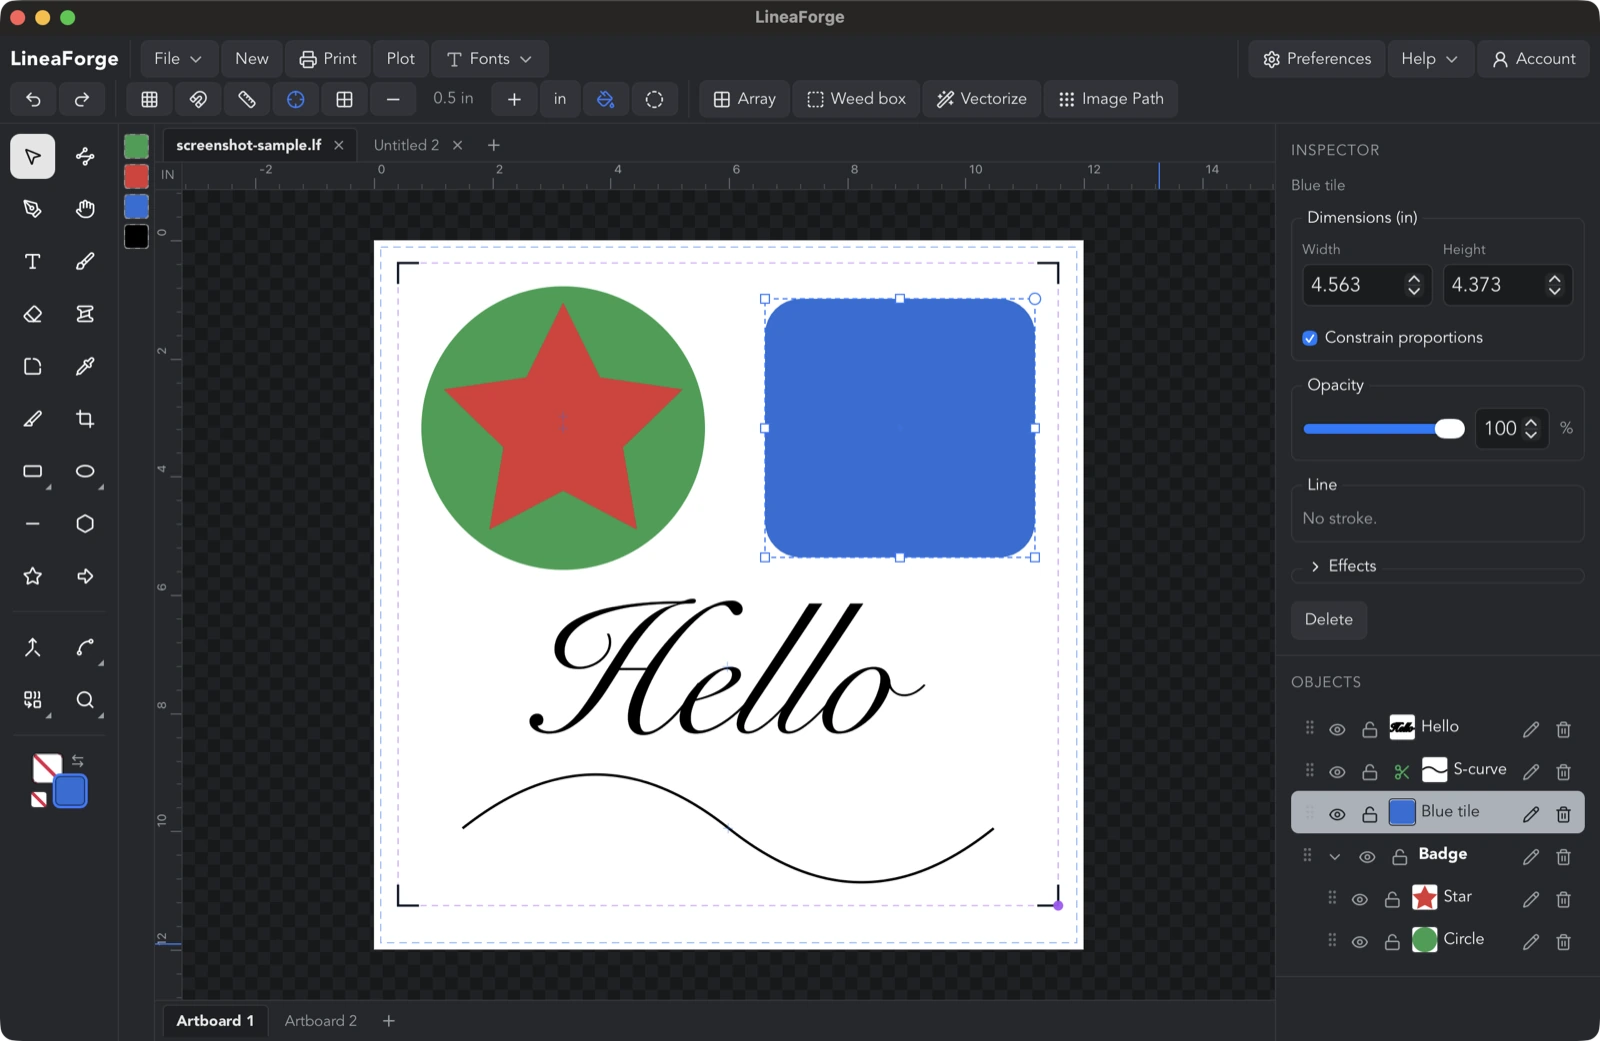
The top toolbar
The first row holds the application-level commands:
- File opens a menu with Document…, Open…, Import, Save, Save As… and Export. See Documents and files.
- Edit lists every command from the canvas right-click menu, applied to the current selection: Arrange, Group, Offset path, Silhouette, Simplify nodes, Mirror, Array, Weed box, Plot settings and the rest. A command that does not apply to what is selected is greyed out. See Selecting and editing.
- New opens the New document dialog, which creates a fresh document in its own tab.
- Print opens the Print dialog (also Cmd/Ctrl+P). See Export and print.
- Plot opens the Plotter dialog, which previews the toolpath and sends the job to a cutter or plotter. See Plotting and cutting.
- Fonts is a menu of your favorite fonts, which can be applied to the selected text, with Google Fonts… at the bottom for browsing and adding fonts. See Text and fonts.
- Preferences holds app-wide settings: SVG import DPI, whether an imported SVG resizes the artboard, cutout tracing on import, autosave, update checks and the experimental 3D mode.
- Help has Check for updates… and About. The About dialog shows the version number along with the License (EULA), Privacy Policy and Terms of Service.
- Account shows your activation details (see above).
The drawing toggles row
The second row is a strip of icon buttons. Point at one to see its name.

From left to right:
- Undo (Cmd/Ctrl+Z) and Redo (Cmd/Ctrl+Shift+Z). Cmd/Ctrl+Y also redoes.
- Toggle grid shows or hides the grid.
- Snap to grid makes drawing and dragging land on grid points.
- Snap to scaffolding lines snaps to the guides you drag out of the rulers.
- Show object centers and snap to them draws a small crosshair at each object's center and snaps to it. This one starts on in a new document.
- Grid style: lines or Grid style: dots switches how the grid is drawn.
- Smaller grid increments and Larger grid increments halve or double the grid cell, with the current cell size shown between them (for example
0.5 inor10 mm). - The unit button shows in or mm; click it to Toggle units (mm / in).
- The fill button switches between showing fills and Hide fills: show outlines only (cut-line view), which is handy for checking cut lines.
- The loose-ends button shows or hides the small dots marking where open paths end.
- Array duplicates the selection in a pattern (A). It is enabled once something is selected.
- Weed box adds a rectangular cut border around the design, so the excess vinyl inside it lifts away in one piece. See Selecting and editing.
- Vectorize traces an image into editable paths, and Image Path draws an image as pen patterns. See Images, vectorize and Image Path.
When the Marker or Eraser tool is active, this row also shows the tool diameter and Smoothing. With the Polygon or Star tool it shows Sides, or Points and Inner. With the Arrow tool it shows the Shaft width, the Head length and width, and the barb Sweep. If Enable 3D (Experimental) is on in Preferences, a 3D button appears at the right end.
The tool rail
The column of icons on the left holds the tools. Each has a tooltip with its single-key shortcut, written as "Ellipse (O)":
- Select (S), Edit nodes (N), Pen (P), Pan (grab to move) (H), Text (T)
- Marker (thick line) (M), Eraser (E), Stroke Profile (variable width) (W)
- Round corners (C), Eyedropper (copy fill & stroke) (I), Knife (K), Crop (F)
- Rectangle (R) and Square share one slot; Ellipse (O) and Circle share another. Hover the slot to pick the variant, or press the key again to switch between them.
- Line (L), Polygon (G), Star (X), Arrow (B)
Below a divider are Join (J), which welds selected open paths into one outline, and three hover fly-outs: Node tools (Break node, Join endpoints, Reverse path, Align handles, Equalize handles), Boolean (Union, Intersect, Difference, Exclude, Knockout) and Zoom (see below). The rail ends with the color tool: a Stroke color swatch, a Fill color swatch, Swap fill and stroke, and a button that sets the active paint to none. Drawing tools are covered in Drawing tools.
The document palette
The thin strip beside the tool rail lists every color your artwork currently uses. Click a swatch to make it the current color (which recolors the selection, if you have one). Right-click a swatch to select every object painted with that color, which is the quickest way to pick out everything that goes on one sheet of vinyl. Point at a swatch to see its hex value and how many fills and strokes use it. The list follows the document: a color disappears when nothing uses it any more.
The canvas
The canvas shows the artboard (the page) with rulers along its top and left edges. The corner where the rulers meet shows the current unit. The strip of file tabs above the canvas lists your open projects, and the strip of tabs below it lists the artboards within the active project. Right-click on the canvas for a context menu of edits that apply to what is under the pointer; the same commands are in the Edit menu in the top toolbar.
The right sidebar
The sidebar on the right has three panels:
- Text appears at the top only while a text object is selected, with the font picker and the Style, Tracking, Leading, Align, Shape and Position controls.
- Inspector shows the selected object's Dimensions, Opacity, Line (stroke width and dash), Align, shape-specific sections such as Polygon, Star, Arrow or Corner, and a collapsible Effects section. With nothing selected it reads "No selection."
- Objects lists every object and group in stacking order. Use it to select, rename (double-click a name), reorder (drag the grip), show or hide, lock or unlock, and delete objects, and to ungroup groups.
Zooming and panning
There is no fixed zoom level to pick; you move the view with the mouse and the Zoom fly-out:
- Scroll the mouse wheel or trackpad over the canvas to zoom in and out around the pointer.
- Hover the Zoom button near the bottom of the tool rail and pick Zoom in, Zoom out, View artboard (fit the whole page in the window) or View selected (fit the selected objects).
- To pan, choose the Pan (grab to move) tool (H) and drag, or hold Space and drag with any tool, or drag with the middle mouse button.
Switching to another project tab or artboard fits the incoming page automatically.
Keyboard shortcuts worth knowing
Tool shortcuts are single letters, listed in each tool's tooltip and in the tool rail section above. Beyond those:
- Cmd/Ctrl+Z undoes and Cmd/Ctrl+Shift+Z (or Cmd/Ctrl+Y) redoes.
- Cmd/Ctrl+S saves, Shift+Cmd/Ctrl+S is Save As, Cmd/Ctrl+O opens a file and Cmd/Ctrl+P prints.
- Cmd/Ctrl+C copies the selected objects and Cmd/Ctrl+V pastes them. Cmd/Ctrl+A selects everything (with the Edit nodes tool and an object selected, it selects that object's nodes instead).
- Delete or Backspace removes the selection; with the Edit nodes tool it removes the selected nodes.
- The arrow keys nudge the selection. Hold Shift for a finer step.
- Alt/Option (⌥)-drag an object to pull a copy off it.
- Escape clears the selection. Enter switches back to the tool you used before the current one, which is a quick way to return to Select after drawing a shape.
- Space-drag pans with any tool active.
- A opens Array for the selection and J opens Join.
Shortcuts are ignored while you are typing in a text field or a dialog.
Units: inches and millimeters
LineaForge works in inches (in) or millimeters (mm). The unit decides how sizes are shown and typed: the rulers, the grid increment readout, the Inspector's Dimensions fields, the tool diameter, and the width and height fields in the document dialogs. Switching the unit converts nothing in your artwork; the design stays the same physical size.
You choose the unit in three places:
- On the Start screen and in the New document dialog, when creating a document.
- With the in / mm button in the drawing toggles row, which switches the current document.
- In File → Document…, under Unit.
The unit belongs to the document and is saved in its .lf file, so a project laid out in millimeters reopens in millimeters. A new document starts in whichever unit you used last.
Your first cut
A short path from a blank page to the machine. Each step points to the topic with the details.
- Create the page. On the Start screen pick 12 × 12 in (or the size of your mat or sheet). To change it later, use File → Document…. See Documents and files.
- Draw or import. Press R and drag out a rectangle, or press T and click to type some text. To bring in existing artwork, use File → Import and choose SVG…, DXF… or Image…. See Drawing tools, Text and fonts, and Images.
- Set colors. Use the fill and stroke swatches on the tool rail, or click a swatch in the document palette. On a cut job the color is a convenient way to group pieces by material: right-click a palette swatch to select everything of that color.
- Check the cut lines. Click the fill button in the toggles row to hide fills and see outlines only, and leave the loose-end dots on so an open path that should be closed stands out. Join (J) welds open ends together.
- Save your work with Cmd/Ctrl+S. The first save asks where to put the
.lffile. See Documents and files. - For a print-and-cut job, open Plot and tick Registration marks (print & cut) under Print & Cut, then print the sheet with Print with marks… in the same section. See Export and print.
- Click Plot to open the Plotter dialog, choose your machine and connection, preview the toolpath on the canvas, and send the job. See Plotting and cutting.
The cut itself and Print & Cut are not yet confirmed on hardware. Run a pen before a blade on a new setup, and check the preview before sending.