
Drawing tools
The tools live on the rail down the left edge of the window. Every tool has a single-key shortcut, shown in its tooltip, and pressing a key never needs a modifier. Shape tools hand back to Select as soon as they have drawn something; press Enter to bring the last tool back and draw another. Everything you place snaps to the grid, scaffolding lines and object centers when those are switched on, and always snaps to the loose end of an open path.
The tool rail at a glance
- Select (S): pick, move, scale and rotate objects. See the Selecting and editing topic.
- Edit nodes (N): move points and handles on a path.
- Pen (P): draw a path point by point.
- Pan (grab to move) (H): drag the view around.
- Orbit (drag to turn the scene) (V): turn the 3D scene. Only shown when 3D is enabled.
- Text (T): place text.
- Marker (thick line) (M): draw a freehand thick stroke.
- Eraser (E): erase freehand.
- Stroke Profile (variable width) (W): vary a stroke's width along its length.
- Round corners (round or chamfer; pick corners, drag to set the size) (C): fillet or chamfer the corners of a shape.
- Eyedropper (copy fill & stroke) (I): copy paint from one object to the selection.
- Knife (drag a line across paths to cut them into open pieces) (K): slice paths.
- Crop (marquee the area to keep, then press Enter) (F): trim everything to a box.
- Rectangle (R) and Square (R): one rail slot, two variants.
- Ellipse (O) and Circle (O): one rail slot, two variants.
- Line (L), Polygon (G), Star (X), Arrow (B).
- Join (weld selected open paths into one outline) (J): a button, not a mode. Opens the Join dialog.
- Node tools, Boolean and Zoom: fly-outs that open to the right when you hover them. Boolean is covered in the Selecting and editing topic.
- The color tool at the bottom sets the fill and stroke new shapes are drawn with.
Shape variants and key cycling
Rectangle and Square share one rail button, and so do Ellipse and Circle. The button shows whichever variant you used last; hover it to see both. The pair also shares a key: press R once for Rectangle and press R again to switch to Square. O works the same way, alternating between Ellipse and Circle. Pressing any other tool's key jumps straight to that tool.
A circle is an ellipse whose two radii are kept equal, and a square is a rectangle whose sides are, so the Square and Circle tools square off the drag for you. The larger of the drag's two extents wins, so the shape follows whichever direction you pull furthest.
Drawing shapes
All of the shape tools (Rectangle, Square, Ellipse, Circle, Line, Polygon, Star, Arrow) work the same way.
- Press and drag. For rectangles and ellipses the press point is one corner of the shape's box and the cursor is the opposite corner.
- Hold Alt/Option (⌥) at any point during the drag to grow the shape out from the press point instead, so it is centered on where you pressed. You can take the key up or let it go mid-drag and the preview follows.
- Click without dragging to drop a default-sized shape at the press point.
- The new shape takes the fill and stroke currently set in the color tool, is selected, and the tool switches to Select. Press Enter to get the shape tool back.
Polygons and stars grow out of the press point already: the press point is the center and the drag distance is the radius. A line runs from the press point to the cursor; with Alt/Option (⌥) held the press point becomes the line's midpoint. An arrow works like a line: the press point is its tail and the cursor its tip, so the drag sets both its length and the way it points. Hold Shift to hold the direction to 15° steps, the same stops the node editor uses.
Polygon sides, star points and inner radius
With the Polygon or Star tool active, the second row of the top toolbar shows that tool's options.
- Sides (Polygon): how many sides the next polygon has, from 3 to 64.
- Points (Star): how many points the next star has, from 2 to 64.
- Inner (Star): how far the points cut in, as a percentage of the outer radius, from 5% to 95%. Lower is spikier.
These settings are remembered between sessions. To change the sides or points of a shape that is already on the canvas, select it and use the Sides, Points and Inner (%) fields in the Inspector.
Arrows
The Arrow tool draws a solid block arrow: a shaft with a pointed head. Drag from where the tail should be to where the tip should be. The length and direction come from the drag (hold Shift to keep the direction to 15° steps); the rest of the shape comes from the tool's options in the second row of the top toolbar, shown in the document's unit:
- Shaft: how wide the shaft is.
- Head: how far the head reaches back from the tip, then (after the ×) how wide it is from barb to barb.
- Sweep: the angle of the barbs, in degrees. 0 is a flat-backed head. A positive sweep leans the back of the head toward the tip, so the barbs trail behind; a negative sweep leans it the other way, cutting a notch into the shaft.
These are remembered between sessions. A drag too short for the head you asked for scales the head and shaft down together, so a small arrow is still an arrow. A click without dragging drops a two-inch arrow pointing right.
Reshaping an arrow on the canvas
An arrow stays live after it is drawn. Select it with the Select tool and four orange handles appear on it, each changing one part of the shape:
- The handle at the tip sets the length. The tail stays where it is, and the arrow keeps pointing the way it did; to turn it, use the ordinary rotate handles at the corners of the selection box.
- The handle on the edge of the shaft sets the shaft width.
- The handle on a barb sets the head's length and width together, since the barb is the corner those two share.
- The handle in the notch, where the head meets the shaft, sets the sweep. Drag it along the shaft.
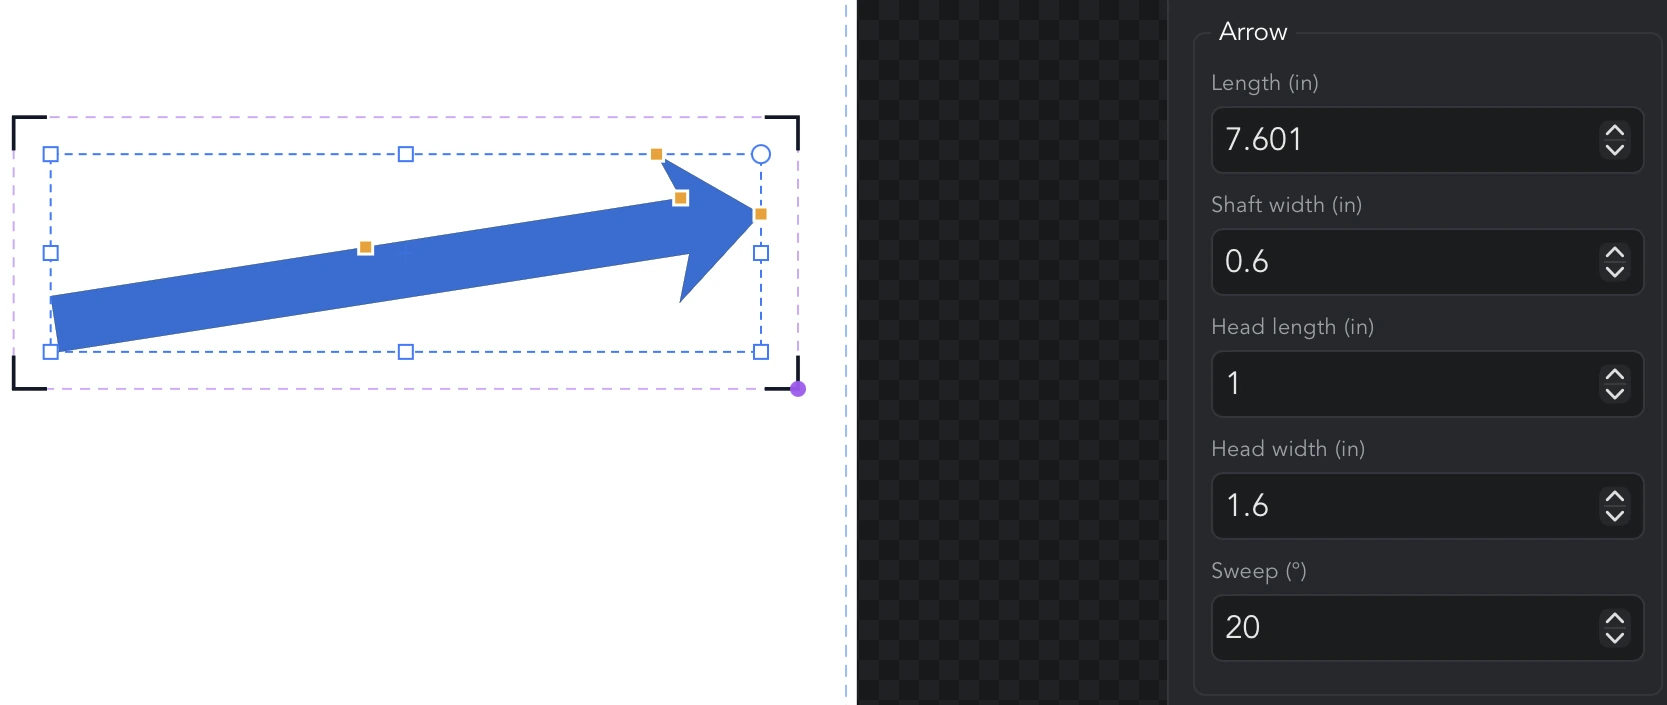
Drag a handle past what the shape allows and it stops at the sensible limit: a head cannot be longer than the arrow, and a shaft cannot be wider than the head. The tip and barb handles snap to the grid, guides and object centers like any other point you place; the width and sweep handles do not, because a grid line means nothing to a width.
To type exact values, select the arrow and use the Arrow section of the Inspector: Length, Shaft width, Head length, Head width and Sweep (°). The fields read in the document's unit, and still do after the arrow has been resized through the Dimensions fields.
Like a polygon or star, an arrow stops being live once its geometry is edited into a plain path (a node edit, a boolean, a simplify): the handles and the Inspector section go away, because from then on the dimensions are no longer something the object has.
Pen: drawing paths
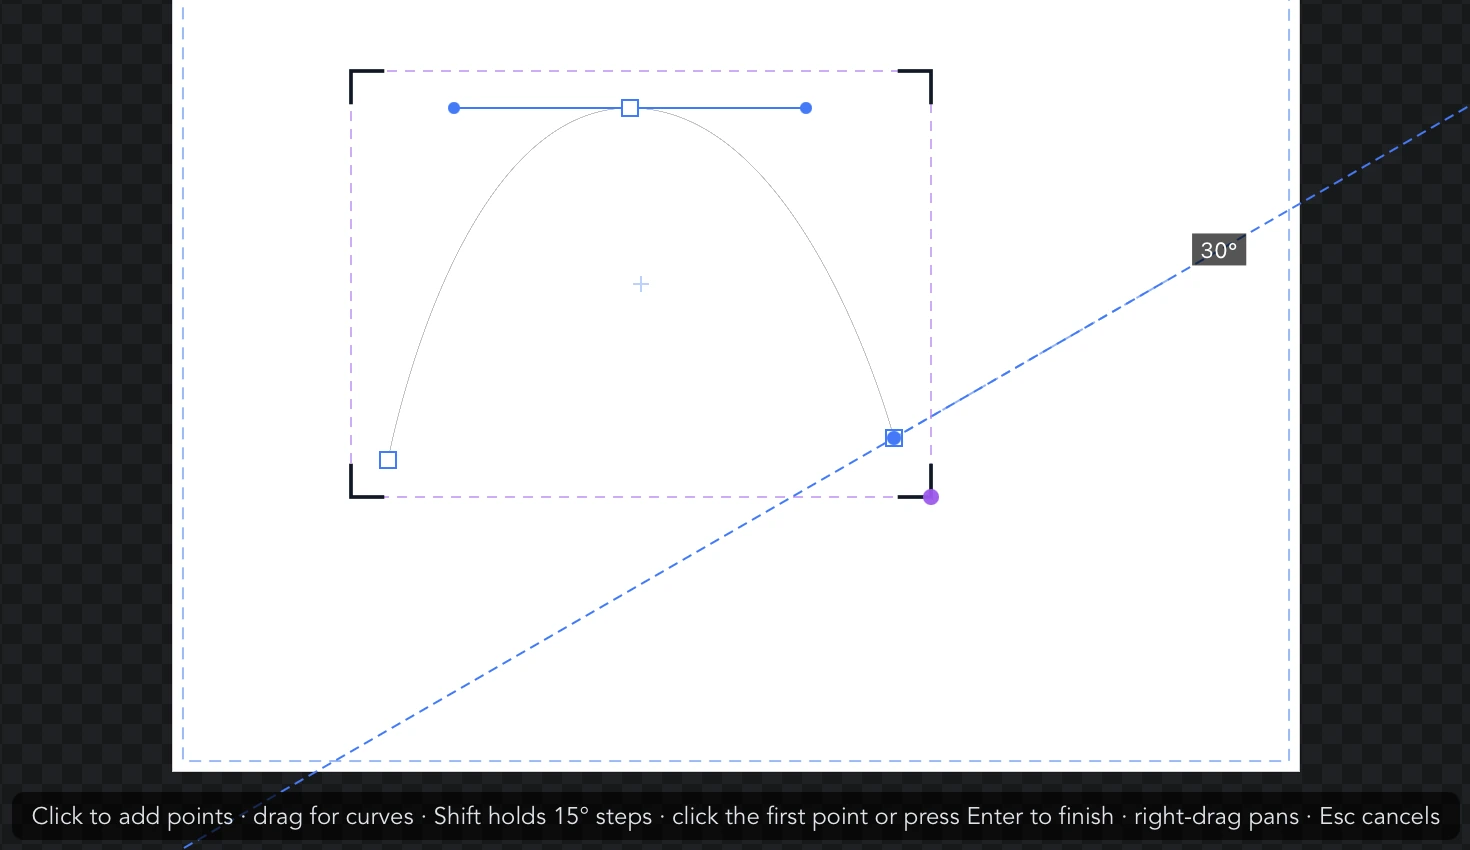
The Pen builds a path one point at a time. While a path is in progress a hint strip below the canvas repeats the essentials.
- Click to add a corner point. The first click starts a new path.
- Press and drag to pull a handle out of the point you are placing. The point becomes smooth, with the two handles mirrored, and the segment arriving at it curves. The handles only grow once the pointer has actually moved, so a click that twitches a pixel still makes a corner.
- Hold Shift to hold the next point to a 15° step out of the last one: level, plumb, the 45° diagonals, and the 30° and 60° angles of a hexagon. A dashed construction line and the angle show where the point will land. Shift also holds a dragged handle to the same steps. The constraint takes and releases as Shift goes down and up, even with the mouse still.
- Points snap to the grid, scaffolding lines and object centers when those are on, and always snap to the loose end of another open path, which is how you draw a bridge that lands exactly on the gap it closes. The pen does not snap back to the point you just placed.
- Backspace or Delete removes the last point you placed.
- Right-drag to pan the view without leaving the Pen, so you can keep drawing past the edge of the window. The path in progress stays where it is. A right-click that does not move still opens the right-click menu. (Space+drag and the middle mouse button pan here too, as they do with every tool.)
To finish a path:
- Click the first point to close the path into a loop. A closed outline is what a cutter needs.
- Press Enter or Escape to end the path open. A path with fewer than two points is discarded.
- When a path is kept, the tool switches to Edit nodes with the path selected, so you can adjust it straight away.
Edit nodes: selecting and moving nodes
With Edit nodes (N) active, click an object to edit it; its anchor points (nodes) appear. A hint strip below the canvas lists the gestures.
- Click a node to select it. Shift-click adds it to the selection or removes it again.
- Drag a node to move it. Grab any node of a multi-selection and the whole set moves together.
- Drag on empty space over the selected object to box-select nodes. Hold Shift to add the box's nodes to the current selection.
- Cmd/Ctrl+A selects every node of the object.
- Hold Shift while dragging a node to hold it where the segment to its neighbor runs at a multiple of 15°. Dragging toward either neighbor chooses that segment; a dashed construction line and the angle show which.
- A dragged node snaps to the grid, scaffolding lines, object centers and the loose ends of other paths. It will not snap to its own path's ends.
- Arrow keys nudge the selected nodes. See the Selecting and editing topic for the step sizes.
- Delete or Backspace removes every selected node.
- Double-click a segment to add a node there.
- Click a different object to edit that one instead. Press Escape to clear the node selection.
Edit nodes: handles, smooth and corner nodes
A smooth node has two handles that mirror each other, so the curve runs through it without a kink. A corner node has no handles, or handles that move independently.
- Drag a handle to reshape the curve. On a smooth node the opposite handle mirrors the move; hold Alt/Option (⌥) while dragging a handle to move it on its own and leave the other where it is.
- Alt/Option (⌥)-click a node to toggle it between smooth and corner.
- Alt/Option (⌥)-drag a node to pull a pair of mirrored handles straight out of it, turning a corner into a curve in one motion. On a node that already has handles, this re-aims them.
- Hold Shift while dragging a handle, or while pulling handles out, to hold the tangent to a 15° step.
Node tools fly-out
Hover the Node tools button on the rail to open its row of actions. They work on the node you have selected with the Edit nodes tool, and are grayed out until you have one.
- Break node: splits the path at the selected node, leaving two loose ends there. Red dots mark loose ends on the canvas.
- Join endpoints: connects the last point of the selected node's subpath to its first, closing the loop. For welding separate pieces together, use the Join button instead.
- Reverse path: flips the direction the path runs in. Available whenever an object is selected in the Edit nodes tool. Direction matters for text on a path and for the order a plotter follows.
- Align handles: puts the selected node's two handles on one straight line through the node, so the curve passes through smoothly.
- Equalize handles: makes the selected node's two handles the same length.
Join: welding open paths
Join sits beside the Knife on the rail because the two are one workflow: cut apart, rearrange, sew back together. Press J or click the button to open the Join dialog. It sews the selected open paths together wherever their ends meet, and closes the outline when the chain comes back round to where it started.
- Tolerance: how far apart two ends may sit and still count as the same point. It starts at 0.1 in or 2.5 mm. Ends further apart are left unjoined rather than bridged with a line nobody drew.
- One object is enough: a path that holds several open subpaths, such as an imported outline or one you have broken open, is as joinable as two separate objects.
- Click Join. The dialog reports how many pieces went in, how many outlines came out, and how many of those closed. A clean result closes the dialog; a partial one leaves it open so you can raise the tolerance and try again, or look for the gap.
Join can only weld ends that really meet. Because drawing and node-dragging snap to loose ends, the reliable way to make two ends coincide is to drag or draw a point onto the red dot.
Marker and Eraser
Marker (M) draws a thick freehand stroke in black. Eraser (E) rubs the same kind of stroke out of whatever it passes over.
- Drag to draw. Hold Shift to draw a straight segment from the press point to the cursor instead.
- The toolbar's second row shows Marker ⌀ or Eraser ⌀, the stroke's diameter in the current unit, and Smoothing from 0 to 100. Higher smoothing removes more hand jitter and produces far fewer, curved nodes; 0 keeps every sampled point.
- Press - to shrink the diameter and = or + to grow it, one unit step (0.05 in or 1 mm) at a time.
- Both settings are remembered between sessions.
Stroke Profile: variable-width strokes
Stroke Profile (W) lets a stroke swell and taper along its length by placing width stops on it.
- With nothing selected, click an object to profile it.
- Click on or near the path to add a width stop there. It starts at the stroke's current width.
- Drag a stop's handle away from the path to widen the stroke at that point, or toward it to narrow it.
- Click a stop to select it, then press Delete to remove it.
- Click away from the path to pick another object, or to clear the selection.
The Inspector offers Reset stroke profile to take the stops off again. To turn a profiled stroke into a filled shape that cuts as an outline, right-click it and choose Expand stroke to paths.
Round corners
Round corners (C) rounds or chamfers the corners of a shape, either all of them or just the ones you pick, inside corners as well as outside ones.
- Click a shape. Every corner is marked with a dot and all of them are picked to start with.
- Choose Round or Chamfer at the top of the floating panel. Round puts a circular arc in the corner; Chamfer cuts straight across it. You can switch back and forth at any point and the shape follows.
- Drag up or down anywhere on the canvas to scrub the size: the Radius of a round corner, or the Distance a chamfer starts back along each edge. Dragging up increases it, and a second pass adjusts the size that is there rather than starting over.
- Click a corner dot to treat only that corner; Shift-click dots to add more.
- The panel shows the size in the current unit so you can type an exact value. Select all and None pick or clear every corner. Drag the panel by its title bar if it is in the way.
- Click a different shape to commit this one and start on that. Click the panel's Done button, or switch tools, to finish. The style you chose carries on to the next shape.
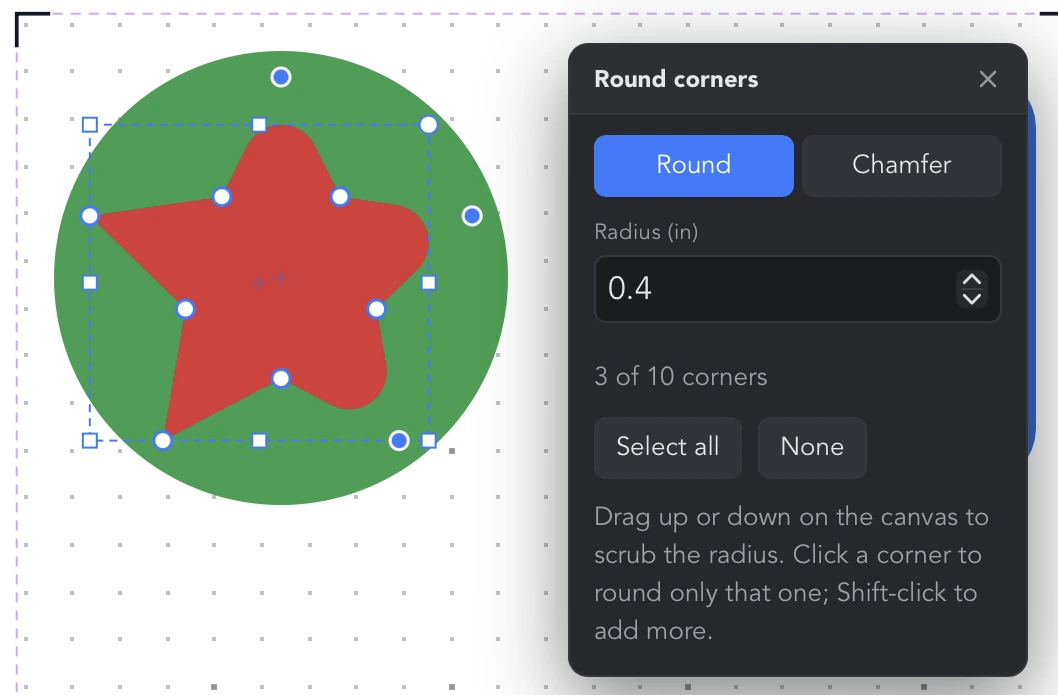
A corner is anywhere two edges meet at an angle, straight or curved: where a circle welded onto a rectangle meets its top edge counts, and the fillet there is a true arc against the circle, which is otherwise left exactly as it was. A shape drawn with the pen rounds as readily as a rectangle.
Corners that share an edge share it fairly. When the size you ask for will not fit, neighboring corners are made smaller together: on a star, the points and the inside corners stay the same radius. A corner whose neighbors are not picked can use the whole of its edges. A rounded corner never reaches past the next node along an edge.
Eyedropper
Eyedropper (I) copies paint from one object onto others.
- Select the objects you want to restyle first.
- Click the object whose look you want. Its fill color, stroke color and stroke width are applied to every selected object. The source itself is left alone even if it is selected.
- The tool stays active, so you can restyle several selections in a row.
Only paint is copied. Geometry, opacity and any variable-width stroke profile on the source are not.
Knife
Knife (K) cuts paths along a straight line into open pieces.
- Drag a line across the paths you want to cut. Hold Shift to hold the line to 45° steps.
- With objects selected, only those are cut. With nothing selected, the line cuts everything it crosses.
- The pieces are selected afterwards, ready to be dragged apart or joined back together with Join.
The knife line is deliberately not snapped to the grid, so you can place a cut by eye. A click without a drag does nothing.
Crop
Crop (F) trims everything to a rectangle. Closed shapes are cut properly rather than masked, and open paths are clipped to the box.
- Drag out the box over the area to keep. Hold Shift for a square box. The box snaps like a shape.
- Everything outside the box is dimmed. Drag the box's handles to resize it, or drag inside it to move it whole.
- The floating Crop panel shows the box as X, Y, W and H in the current unit, so you can type exact numbers.
- Press Enter, or click Apply (Enter), to crop. Press Escape, or click Cancel (Esc), to abandon the box.
With objects selected, only those are cropped; with nothing selected, everything the box overlaps is. Objects the box does not reach, and objects wholly inside it, are untouched. Pressing anywhere outside the box starts a fresh one, and a click with the crop tool clears the box.
Text
Text (T) places text. Click where the text should start and type. Enter starts a new line; Escape or Cmd/Ctrl+Enter finishes the edit. Double-click any text object, with any tool, to edit it again. Fonts, size, spacing, text on a path and converting text to outlines are covered in the Text and fonts topic.
Pan, zoom and the view
- Pan (H): drag to move the view. With any tool, hold Space and drag, or drag with the middle mouse button, to pan without switching tools. With the Pen, dragging with the right mouse button pans as well.
- Scroll the mouse wheel over the canvas to zoom in and out around the cursor.
- The Zoom fly-out on the rail offers Zoom in, Zoom out, View artboard (fit the whole artboard) and View selected (fit the selection).
Panning and zooming change only the view, so they never add undo steps.
Switching tools from the keyboard
- Press a tool's letter to activate it. The keys are listed in the tool rail's tooltips and at the top of this topic. No modifier is needed, and a key pressed while typing into a field is left alone.
- Enter switches back to the tool you used before the current one. Shape tools return to Select as soon as they have drawn, so Enter is how you draw several shapes in a row; pressing it again goes back to Select.
- Escape clears the selection. While a pen path is in progress it finishes the path, and while a crop box is on screen it abandons the box.
- A opens the Array panel when something is selected, and J opens the Join dialog. Neither is a tool, so neither changes what the mouse does.
- V only activates Orbit while 3D is enabled in Preferences.
Orbit (3D)
Orbit (V) appears on the rail only when Enable 3D (Experimental) is switched on in Preferences, and only means anything while the 3D view is showing.
- Drag sideways to turn the scene and up or down to tilt it. Hold Shift to lock the drag to whichever axis it has committed to.
- Double-click anywhere with the Orbit tool to return the scene to straight-on.